Thursday, September 25, 2008

Taking Photographs of Fireworks!

Shooting Fireworks!

Sorry for the delay. Vacation is over, back to the writing!

Those of us in the United States typically watch Fireworks around the Fourth of July. We fire those fireworks in celebration of adopting the Declaration of Independence, declaring to the British thanks, but we have it from here on. Other countries have fireworks displays on New Years Eve, Canada Day and many others holidays. This presents the Photographer with a great opportunity for some awesome images. Here is a guide to get you started.

Please keep in mind that there is no hard and fast rule to photograph fireworks. This is a guide. You must do a little experimentation to see what works best for you. Fortunately, by following this guide you will have a great foundation to start with. Tweaking your camera settings during the fireworks should be minimal, just be prepared to adjust when needed.

Can you shoot Fireworks with a Point and Shoot? Absolutely! Well, maybe! Some P&S cameras have a Fireworks setting. Some don't. Just be sure that your camera has the ability to setup manual focus and exposure. Without a doubt an SLR is easier to use for Fireworks, but it is not required. I have used both and have results that I am happy with.

First off, as a general rule, exposures will be in the 2 – 10 second range at ISO 100, at f5.6 to f8, so you need a tripod. You also need a way of triggering the camera without shaking it. You might be good enough to trip the shutter without shaking the camera, but a remote trigger makes life a lot easier. My old Canon G3 came with an infra red remote, very nice to have. I purchased a remote trigger for my Canon 20d and 5d.

Tripods are one of the things that can make Photography easier and hard at the same time. They make life easier by holding the camera steady, and they make life harder since you have to lug it around. For a small P&S camera an inexpensive tripod will do fine. If you have an expensive camera, or a heavier camera like an SLR, going with a more capable tripod is the way to go. I chose a Manfrotto tripod with a Manfrotto Grip Ballhead since my SLR is quite heavy depending on how I have it set up.

--- Hmm, I think we should have a Tripod article. Stay tuned! ---

Set your ISO at 100. Don't know what I am talking about? Read your manual! ISO 100 is a setting on your camera, controlling how sensitive the sensor is to light.

Set the f-stop to f6.3.

Set the shutter speed to 8 seconds.

Open the shutter just before the fireworks explode in the sky! You can tell since they use a small explosion to lift the fireworks into the sky, before the big boom and display.

This is a great place to start experimenting with the exposure. Perhaps you can't shoot at ISO 100. If you are limited to 200 and above, set it to 200 and set the f-stop to f11. Again, experiment with it. If you are shooting Film all of this is the same. Use a 100 speed film and set it as above. Shooting slides? Same as above but vary your exposure more since slide film tends to have a limited dynamic range. Do you have a remote control for your camera? Also try to shoot in Bulb mode (the shutter stays open for as long as you hold down the shutter release).

Here are some of the shots I took last July 4th. I have included the exposure information for each shot.


This is my favorite shot of the night! I used a Canon 15mm Fisheye lens set to f6.3, 8 seconds. All of these shots are at ISO 100.


f6.3 and 3 seconds.


f6.3 and 5 seconds.


f6.3 and 10 seconds.


This is a great example of overexposure! I included it to show what happens if you go a bit too far. f6.3 and 9 seconds.


f8 and 2 seconds.


Last shot of some cool gold fireworks! f8 and 1 second.


Well, there you have it!These settings worked well for me, but they may not work well for everybody. As you may have noticed, these images are not a moment in time, they are actually long exposures where the fireworks painted an image onto the sensor. You can try to take shorter exposures that freeze the action but this is the look I wanted from these images. If you want to freeze the action I would boot the ISO up a bit, open the aperture and shoot at a speed that works for you. The main thing is to experiment and have fun!


Wednesday, September 3, 2008

Guess I took the summer off...

Sorry all, I kind of took the summer off...

I have two articles in the works that I want to release this month, shooting Lightening and Third Party Lenses. Please stay tuned for those articles and feel free to check out some of the older ones!

Tuesday, July 15, 2008

Reinstalling Windows when you have PhotoShop

I was participating on the forums at DPReview.com and came across somebody in trouble with viruses, spyware, malware and whatnot. Her computer was infected and couldn't be cleaned. Everything she tried ended up failing. My solution was simple: Reinstall the Operating System.

Reinstalling Windows XP is not very hard, but the directions I gave were more complex then you might think. To help everybody have the best outcome when faced with this task I have compiled a list of steps to follow.

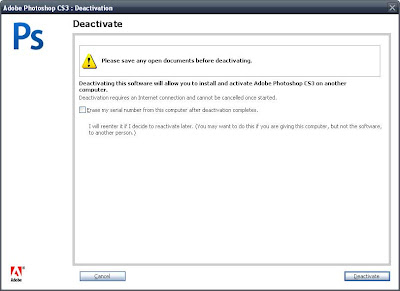
Please note step 2. It deals with deactivating PhotoShop. PhotoShop CS3 can only be installed on two computers at the same time. To help ensure that PhotoShop CS3 is not installed beyond what the license says, they have instituted an Activation system. To use CS3 beyond 30 days you must activate. Just like Windows XP or Vista activation it can be done online or over the phone. To use it on the new install of windows I would first deactivate it. Do so by opening PhotoShop and clicking on Help, then Deactivate. Other software has systems like this in place such as iTunes. Check out all of your software before reinstalling an OS.


Here is how to reinstall Windows XP and hold on to your PhotoShop licenses.

  1. Backup any and all needed files. This includes music, pictures, documents, etc.
  2. Deactivate any software that was activated such as PhotoShop and other Adobe products as well as iTunes. There may be other software that should be deactivated as well.
  3. Remove the hard drive from the PC, install a new one.
  4. Install the OS on the new drive, apply all updates, and install anti virus software. Install any required applications.
  5. Disable autoplay. This is the process that loads newly attached drives or loads CDs or DVDs. Holding down the shift key does the same thing. The reason is to ensure that any viruses that exist on the old hard drive are not loaded when it is attached to the clean PC with the external enclosure.
  6. Install the old hard drive in an external drive enclosure. Copy your data from it to your new drive over USB. Make sure your virus scanning software cleans any infected files.
  7. After running this way for a month, and you are sure you have everything, format the old drive and use it in the external enclosure for extra storage.
This method is not without cost, but I think it is the best method for getting rid of viruses or for just reinstalling Windows. It has the benefit of giving you a very clean system to start over with while keeping your old drive available should you forget something.

Good luck, and avoid these pesky Viruses!

Monday, July 14, 2008

Look out Hassy, Phase One just released a 60 Megapixel FF back!

Phase One has just released a new 60 Megapixel, Full Frame digital back. This is some interesting news since Hasselblad just released a 50 Megapixel cropped sensor back.

The deal on cropped vs full frame is the size of the digital sensor when compared to the original format of the camera system. This new back from Phase One is the size of a 645 frame of 120 film, also known as 6 cm X 4.5 cm. Most of the other Medium Format backs to date have been smaller then a 645 frame.

Phase One is continuing to innovate in the face of stiff competition from Hasselblad. This competition benefits us all by improving technology and drive down price.

Who wants to take a bet that there will be a 100 Megapixel, Full Frame 645 back by the end of 2009?

Tuesday, July 8, 2008

Hasselblad H3DII-50 - 50 Megapixel Medium Format wonder

Hasselblad has just announced the H3DII-50, a 50 Megapixel Medium Format sensor for their H3 line of Medium format bodies.

An awesome feature of the Kodak 50 Megapixel sensor is a Heat Sink. Part of the problem of long exposures with a digital camera is the heat build-up in the sensor. As the exposure goes into the minute-plus range the sensor will heat up. The affect of this heat is additional noise in the image. The Heat Sink will keep the sensor cool for long exposures, helping to keep the noise levels acceptable.

So, how much is this puppy going to set you back? My guess is $50,000 US Dollars. Start saving now...

Friday, June 13, 2008

New dSLR on the way - Canon EOS 1000D

Nikon has really come on strong with new additions to its dSLR line, adding models to both the High End Pro market as well as the Consumer dSLR market. Not wanting to be left behind, Canon had released a new model for the Consumer market, the EOS 1000D.

DPReview.com has a preview of the new camera and appear to be testing it. Here is the Preview, and here is a sample gallery from a pre-production camera.

Some of the features include a 10 megapixel sensor, dust control, Live View and high ISO noise reduction. I bet this camera is the lowest prices Canon dSLR yet!

In addition to the new body, Canon is also releasing a new flash, the 430EX II. DPReview has the details. Some of the new features seem to from the new 580EX II, such as a new mounting foot. It should also recycle faster and with less noise then before.

I think that the 1000D will come in at a fairly low price, perhaps with a street price in the $450 to $500 range. Canon seems to be facing pressure from other manufactures on price and features. The Nikon D40 may have been a wake-up call at Canon, the 1000D may be the response.

Friday, April 25, 2008

New T-Max 400 TMY - Scanning is much improved

Many photographers have said Film is Dead. Well, Kodak didn't get the memo. They have recently released an improved version of their excellent T-Max 400. I picked up a roll and shot it in the New Jersey Botanical Gardens.

Here is an example:


This was shot with a Canon Elan 7NE with the Canon 24-70 f2.8 L zoom lens. Center-weighted averaging metering. Developed with D-76, full strength.

Here is a link to Amazon.com for the Canon 24-70 f2.8 L lens. Check it out!

Canon EF 24-70mm f/2.8L USM Standard Zoom Lens for Canon SLR Cameras

Although you can't tell from this image, the grain seems finer then T-Max 400, and a lot finer then Tri-x 400. I scanned it on the Nikon Coolscan V ED. This is the easiest scanning film I have come across. It makes me wonder if they made the changed to the film just to improve its scannability. Just awesome!

Check out the info on Kodak's page on the new T-Max 400, pick up a roll and give it a shot. You will love it.

Sunday, April 6, 2008

Carbonite On-Line Backups

Looking for an easy way to securely back up your data? Something easy to use? A service that is focused on the needs of the customer? Carbonite is it.

I've been using Carbonite to back up my vital documents and photographs for a year now and have no reservation recommending it to anybody who has photographs or other important documents or files to back up. The service is quite impressive with its ease of use. I first heard about Carbonite from Leo Laporte on one of his TWiT.tv podcasts. Glad I did.

Check out my article on why it is so important to back up your photographs here.

Carbonite uses the Internet to back up your photographs off-site, away from your home. It's basically a small program that runs in the background that monitors your My Documents folder for files to back up as well as any other folder you choose.

When first installed Carbonite will start to upload an encrypted copy of the contents of your My Documents folder to their servers. This may take some time depending on you Internet connection speed, or rather your upload speed. (Upload speed is often much slower then download speed.) When the initial upload is completed it will monitor the My Documents folder for any additions, updates or deletes, reflecting that change with the copy on their servers.

Adding additional folders to your backup is VERY easy. I don't store pictures in the My Documents folder, I store them on a separate hard drive. To back up these pictures all I had to do was open Windows Explorer and navigate to D:\Pics. Right clicking on the folder will open a menu with Carbonite as a option. The Carbonite menu gives an option to either "Back this up" or "Don't back this up". Can't get easier then that, right?

Click on the image to see a full-size version

A great feature of the service is recovering a deleted file. Carbonite keeps a copy of all files deleted from backed up folders for 30 days. This can save people a lot of grief if they accidentally deleted a file. Note: If you right click on a file or folder that is already backed up and select Don't back this up it will be deleted within 72 hours.

Give Carbonite a try. After being a customer for the last year I can recommend them without hesitation.

Thursday, March 27, 2008

My Mini Photoshop Express (Beta) Review

Now they've done it. Adobe released an on-line version of PhotoShop. Here is my take on it.

First off, PhotoShop Express is not at all like PhotoShop. The full version of PhotoShop is a pixel editor. PhotoShop Express it is an image editor, so don't expect the to be able to make changes as fine as you could with PhotoShop CS3. Now that I have cleared that up... PhotoShop Express is for people looking to edit and share their photographs. It is all done on-line, no software to install (well, you need Flash installed with a Web Browser such as Firefox). And its FREE! So, how does it all work? Let me tell ya!

First, open an account here. Registration is fast and simple. Then upload some photos. PhotoShop Express is giving people 2 GB of storage on the web, a nice amount to play with for sure! You can also use it to edit your photos on Facebook, Photobucket and Picasa.

What can you do with your images? Check out this list!

  • Crop and Rotate
  • Auto Correct
  • Exposure
  • Red Eye Removal
  • Touchup
  • Saturation
  • White Balance
  • Highlight
  • Fill Light
  • Sharpen
  • Soft Focus
  • Pop Color
  • Hue
  • Black and White
  • Tint
  • Sketch
  • Distort
Some list, huh?

Now that you have edited your images you can also organize them into online albums and choose what to share or not to. You can also download the edited image onto your computer. There are a couple of restrictions. You can't upload images larger then 4000 pixels per side (not a problem for most cameras). You can also upload .jpg images only, no .tiff, .png, raw, etc.

I uploaded three images and played around with the features a bit. (The upload speed depends on how fast your connection is to the web and how large the image is.) I cropped a family portrait and converted it to Black and White in less then a minute. I then downloaded it to my PC and found the quality to be quite nice! The other affects were fun to use and produced some good images.

Die hard PhotoShop mavens need not look here, but for the average person who does not want to learn a program as daunting as PhotoShop its a great place to start! More and more applications are moving onto the web, its only natural that Adobe released a site as great as this. I give it 5 stars!

Saturday, March 22, 2008

Backing it all up - Don't lose your Pictures!

I think one of the greatest advantages that Digital Photography has over Film is how easy it is to make a copy of a photograph. The real big problem is that not many of us do. We tend to store everything on a small, mysterious device called a Hard Drive, never thinking about what would happen if the drive crashed. This is a device that has replaced the family Photo Album but will never last as long. Lets look at what can happen if things go bad with your hard drive.

A hard drive has one or more disks in it called platters. A typical Desktop Hard Drive spins about 7200 Revolutions Per Minute, faster then the engine in your car. A small read/write head hovers over the surface of the platters, less then the thickness of a human hair away, reading and writing data on the disk. The head moves so fast you can't see it. The drive also has a controller board attached to the bottom that tells the read/write head what to do, where to write the data on the drive.

Here are some of the things that can ruin a drive, and your photographs:

  • A Lightening Strike can destroy your drive, even if it is not close to your house.

  • Power fluctuations from your electric company, including blackouts, brownouts and surges

  • Fire or Theft

  • A virus can wipe all of the files on your drive, or even hold them ransom for money

  • The read/write head can come into contact with the surface of the drive, “crashing” the drive.

  • Some or all of your pictures can be accidentally deleted.

  • The controller board can fail

  • The drive motor or bearings can fail or wear out

Well, as you can see, there are many reasons a drive can fail. In fact, some 3% of all drives fail every year! (Not so much IF your drive will fail, but WHEN!) So, how do you safeguard your photographs as well as other files? BACK IT UP! Backing up your pictures is so important, yet not many of us do it. Is backing up easy? It can be. Here are a few options:

  1. Back up your data to an external hard drive and store it away from your computer. And by away, I mean far away! Your backup should not be stored in the same building as your computer. A good rule of thumb is to store your work files at home and store your home files at work. IN this case I would get in the habit of backing up your data every week.

  2. Back up your data to a recordable CD or DVD, then mail it to friends or family. This is a great, not too expensive way of backing up. It does take some time but the important thing to remember is that your pictures are away from the computer. Please note: Recordable CD and DVD disks do not last forever. To maximize their life store them in a cool, dry, dark place. Replace them after 18 months.

  3. Use an on-line service to back up your pictures. Carbonite is the one I use. Mozy is another good backup service. They back up your files to the Internet for a fee. It is best to have a broadband connection, it would be way to slow if you had dial-up!

Two things to keep in mind. First, back up often. Second, keep the backup off site, away from the building where your computer is. It is not a backup if it is sitting on top of your computer!

Questions or comments? Just click on the Comments button below!

Monday, March 17, 2008

5 tips for buying your first dSLR

In the last few years photography has experienced an explosion of not only new cameras but also new photographers! There has been a massive amount of new digital camera offerings bringing about Photography Version 2.0. The ability to take a photograph and then retake it if it does not look good on the camera's LCD screen is nothing but revolutionary compared to where we were in the good old Film days.

Due in part to lowering cost as well as fast performance, the Digital SLR (or dSLR) is one of the hottest electronic items today. But where do you start, how to decide what camera is best for you? Read on and pick up a few things to look for when you decide.

1) Try it on for size! - Before buying a new dSLR go to your local camera retailer and handle a few. For me, Canon just seems to fit better in my hand then other brands. The controls work well for me, but that's just me. You need to go to the store and see what works for you. It may be a small consumer model, such as the Canon XTi or Nikon D40, or perhaps a larger body will work better for you. There is only one way to find out!

2) Megapixels don't matter (that much!) - Lets be honest here. Have you ever made a print larger then an 8x10? Are most of your prints 4x6 or 5x7? Then 4 megapixels are enough. Today's offerings of 6, 8 or even 10 megapixels in a consumer dSLR is plenty, so don't base your choice on megapixels alone. It is more important to consider image quality.

3) Get an extra battery - Most dSLR cameras come with great battery systems, capable of taking hundreds of shots without recharging. But what do you do when the battery runs out? Dropping in a few AA batteries is not an option. Be sure to get an extra battery so you don't run out when you cross paths with a great shot.

4) Buy a fast Memory Card - Your camera will bog down with a cheap, no name memory card. It's important to buy a card that will keep up with your camera and given how inexpensive they are today its a no brainer! I prefer Sandisk Ultra memory cards for my cameras, don't skimp when buying yours.

5) Don't buy a deal that sounds too good to be true! - Too many people have fallen victim to scams when they fall for the deal of a lifetime. There are many camera stores that advertise a low (way too low!) price for an expensive camera, only to try to sell you hundreds of dollars of "required accessories" that you don't need or could buy on your own for just a few bucks.

When you turn down the offer for the accessories (perhaps for the fourth or fifth time!) all of the sudden the camera will no longer be in stock! Ordering online is not an easy way around this either! They will call you to confirm the order and then try to up-sell you, and when you turn them down, again, it will out of stock. Just walk away, it is not worth getting involved with these shady companies. Go with a reputable store like B&H, Adorama, Calumet and other good businesses. This is a great time to search for them on resellerratings.com to see what kind of a business they run.

BONUS Tip!!! - When you buy a camera you are buying into a camera system. Make sure that the camera line you buy into will be able to grow with you. Some camera lines have more lenses, flashes and accessories then others. Take this into consideration when it is time to buy.

"Sometimes I do get to places just when God's ready to have somebody click the shutter." - Ansel Adams

Good luck with your new camera!

Sunday, March 9, 2008

How to shoot film for less - Bulk Loading your film

Bulk Loading 35 mm film has been around for may years. It's a great way to save some $ for those that shoot a bunch of film. Cost savings run up to 45% over the cost of buying single rolls. This is a great savings for students taking a course in Photography or those of us who love to shoot film.

So how do you get started? You need to pick up a Bulk Film Loader, a changing bag (not the diaper kind!), some 35mm Cassettes For Bulk Film and bulk rolled film. Here is the break-down:

Bulk Film Loader - There are a few models to choose from, the most popular being the Watson Bulk Loader and the VERY similar Alden 74. Arista makes a bulk loader as well. They work by transferring film from the bulk reel into a 35mm film cassette, all in the dark. Its important to read the manual to ensure that you don't let light hit the large roll of film. ebay is a great place to pick one up on the cheap but don't pay too much since they are less then $35 new.

The Alden #74 Winder


Changing Bag - You need to load the film into the loader in 100% darkness. You can wait till dark and use an interior room, but total darkness is a must. The easier way is to use a changing bag, basically double layer cloth bag that has two arm holes in it that will block all light.

35mm Cassettes -
The film will be loaded into empty 35mm film cassettes. They go for less then a buck each. I prefer the metal cassettes over plastic since the plastic ones don't work well in my camera.

Bulk Film Cassette

Bulk Film - There are a LOT of choices for bulk film, even in 2008! Just be cautious of buying E-6 or C-41 film (color slide film and color negative film, respectively) as not many labs will develop bulk film. This is because developing the wrong type of film can ruin an entire batch of their chemistry, causing them to throw it out and potentially ruining other customers film as well. Be prepared to develop it all yourself unless you have a good relationship with a pro lab. Fortunately, developing B&W film at home is quite easy. Developing Color film or slides at home is a bit harder but can be done. There are a lot of bulk film choices, here is what I found with a 2 minute search of only two photography supply sites, just be sure that it has some indication along the lines of "Perforation for Bulk Loading" or "Perforated":

Bulk Film Roll


  • Kodak T-Max 100 and 400 B&W Film
  • Kodak Plus-X Pan B&W Film
  • Kodak Tri-x Pan B&W Film
  • Kodak Portra 160NC and 400NC Color Print Film
  • Kodak Ektachrome 64T Color Slide Film
  • Kodak Ektachrome E100VS Color Slide Film
  • Kodak Ektachrome E100G Color Slide Film
  • Ilford Pan-F Plus 50 B&W Film
  • Ilford Delta 100 and 400 B&W Film
  • Ilford HP4 and HP5 B&W Film
  • Efke KB25, KB50, KB 100 and KB400 B&W Film
  • Foma 100, 200 and 400 B&W Film
  • Forte 100 and 400 B&W Film
  • Rollei Retro 100 and 400 B&W Film
  • Arista 100 and 400 B&W Film
  • Arista 400 Color Print Film
Quite a list! If you know of a film that is not on this list please add a note to the comments, I would be glad to add it!

Bulk loading film can save you some bucks and also enable you to make custom length rolls of film. When I shot the article Kodak Tri-X 400 35mm in D76 and Diafine I used 10 frame rolls of film!

Get out and SHOOT!

Thursday, March 6, 2008

What is Digital Zoom?

We have all seen cameras with specifications such as 4X Optical and 4X Digital Zoom. Seems great, right? Not quite...

Digital Zoom is not nearly the same as Optical Zoom. Optical Zoom uses Optics (A.K.A. the Lens!) to zoom in to your subject. When a Camera uses Digital Zoom it actually throws away pixels from your image, and this is not something you want to do if you want great looking images! The Digital Zoom feature uses less of the sensor to capture the image. It basically ignores the pixels towards the outside edge of the sensor. The downside is you loose image quality.

What do you do if you want to zoom in closer? The easy answer is to get closer to your subject! Sometimes that is just not practical so your other solution is to use software on your computer to crop the image, "zooming" into your subject. Why is this better then Digital Zoom? The better software packages out there will add pixels to help make the image look better. PhotoShop and PhotoShop Elements does this quite well as well as other competing products.

So, how do you avoid using Digital Zoom? Most cameras will have a "Digital Zoom? YES NO" setting in their menu systems like I found on my Canon PowerShot. Check your manual, it should be easy to find if it is available. If you don't have a setting to turn it off most cameras will give some indication that they are going from Optical to Digital zoom. Sometimes there is a visual indication on the screen, it might just be a line on the zoom scale. It may also have a slight pause when zooming if you use Digital Zoom.

Menu from my Canon PowerShot

Good luck and take a lot of pictures!

Monday, February 25, 2008

Pen Tablets - Stop using the mouse!

Here is a Post Production secret: a lot of photographers use Pen Tablets instead of a mouse with PhotoShop. Graphic Artists, Illustrators and Digital Artists also use them, and you can use one with more then just PhotoShop. I personally find it easier to draw on an image with a Pen Tablet, a mouse is just not as accurate and "real". For artistic use it works on everything you would use a mouse for.


Here is the lowdown: As you can see from the photo above of my tablet, this Wacom Intuos tablet comes with a pen, pen holder and mouse. It connects to your computer via a USB cable or BlueTooth. The buttons on either side can be customized through the included software. There are also two zoom sliders as well.

The coolest part? It's pressure sensitive! The harder you press, the more of an effect it has on your image. For example, if I set the Healing Brush in PhotoShop to 100 and then start to correct an image, the brush size is small with less pressure, and larger, up to 100, when I press harder. How sweet is that! The ability to change brush size with pressure is a great time saver.

Looking to bring your post-processing workflow a boost? Give a Pen Tablet a try. Check our wacom.com for a good fit, they are available in many sizes. They even have a version that is an LCD monitor and tablet in one!

Wednesday, February 13, 2008

Canon 500D Close Up Lens: The Un-Macro

I wanted to take detailed shots at weddings of the small things, like the rings and such. Macro images have a place in the album along side the regular shots. But I was missing an important piece of equipment; a Macro lens.

The best choice for me seemed to be the Canon 100mm Macro. It has great image quality and people were also using it for portraits. The two downsides with the 100mm Macro are slow focus and price. Seemed to be a great studio lens but not so great for on-location shooting where the focus may change for every shot. So I kept looking, trying to find the right fit for me.

Reading a lot of forums pointed me in the right direction. Somebody suggested to try out the Canon 500D close up lens. It is a lens that attaches to your regular lens just like a filter. It does have its own limitations like it will only work with lenses in the 70 - 300mm range, and it cannot focus farther then 4 feet. On the positive side it was less expensive then the 100mm Macro, it was small and easy to carry in my bag and it worked with my 24-70 and 70-200 lenses!

Here are some images taken both with the 500D and without. All shots were taken on white seamless paper, Alien Bees with umbrella and a Canon 580 EX in a small softbox.

Canon 500D Close Up Lens

This is an oil lamp, taken with the Canon 24-70 f2.8 L.

Taken with the 24-70 f2.8 L and 500D.
Taken with the Canon 70-200 f2.8 L IS.
Taken with the Canon 70-200 f2.8 L IS with the 500D.
As you can see, the 70-200 really delivered with the 500D attached. I would use a tripod with it since the 500D adds a bit of heft to the end of the lens.

Want to go even cheaper? How about using your Point and Shoot? Depending on the assignment, you may not need 12 Megapixels to capture a great image! Here is an example from my 6 year old Canon G3, a great 4 Megapixel camera. A lot of Point and Shoot digital cameras can also take great macro shots. They benefit from really small sensors that deliver awesome depth of field. Here is an example.

Canon G3, set to Macro

The old Point and Shoot didn't do too bad, huh? I think a Point and Shoot can be a great choice over a Macro or Close Up Lens depending on the subject and output quality.

Saturday, February 9, 2008

Kodak Tri-X 400 35mm in D76 and Diafine

I have read a lot of information on the developers used with Kodak Tri-X 400 on the photo.net B&W Photo - Film & Processing Forum. Two of the most popular are D76 and Diafine. To see just what each can do I decided to test for myself.

All shots were from a Canon Elan 7ne with a 70-200 2.8 L IS. The lighting was from an Alien Bees 800 monolight. Exposure was at f9.5, 1/100 for a given ISO rating, the lens was set to 135mm. All film was from the same 35 mm 100 foot roll. For comparison, I am including some shots from my Canon 5D to see what a Full Frame digital camera can deliver.

Please note: Even though I loaded no more then 15 frames per roll for this test, the D76 1 to 1 development included 8 fluid ounces of D76 Full Strength and 8 fluid ounces of water. This is importand on full rolls to ensure that you don't exhaust the developer. I followed this practice here to ensure proper development.

All times were sourced from the Massive Dev Chart on digitaltruth.com.

Scanning was done with a Nikon Coolscan V ED. Settings were 4000 dpi, 16 bit gray, to a .tiff file.

Here is the full scene
5D @ 1600 ISO, Full Scene

Here are the crops

D76, Full Strength @ 400
D76, Full Strenght

D76, Diluted 1 to 1 @ 400
D76, Diluted 1 to 1

D76, Full Strength @ 1600
D76, Full Strength @ 1600 ISO

Diafine @ 1600
Diafine @ 1600 ISO

5D @ 1600
5D @ 1600 ISO

Conclusion:

If you are going to shoot Tri-X at ISO 400, then D76 1 to 1 is great. I think the image has more clarity then at full strength. If you want to shoot Tri-X at 1600, although the D76 negative looks pretty good, to me the Diafine image has a more gritty, B&W look.

It is interesting to see that the 5D can pull such detail out of a 1600 ISO image. Although a great camera, it does lack the dynamic range that film can deliver. Hopefully they will start looking to improve DR in the future instead of more megapixels.

And don't forget! If you want to have great film like this available 20 years from now buy some today and create some art!

Film is Dead. Long Live Film!!!

Sadly, Polaroid has decided to stop production of its instant film. Edwin Land must be turning in his grave. First patented in 1929, it appears that 2009 will be its last year in production. I doubt that the consumer market was buying all that much, and that most was used by professional photographers who used it as a preview of their exposure before exposing their normal film.

I wonder what this means for portrait photographers such as Elsa Dorfman?

But all is not so bleak for those of us who shoot film (now known as Analog Photography!). Kodak's Chief Executive Antonio Perez had some good things to say about the future of Film still photography, stating film was on their road map for the next 4 years since it still generates good revenue, article can be found here.

Additionally, Kodak has not only released new, improved emulsions for some of its Portra professional negative film, but they have also released a new emulsion for their T-Max 400 black and white negative print film as well! Who would have thought they would still be looking at black and white film!

Fuji is not standing still, either! They have recently released a new version of their iconic transparency Velvia 50. They also released new Pro films in 2005.

Even more impressive is Fuji's release of the Fuji GF670, a new 120 film, 6x7 folding rangefinder with a bellows!

Now if there was only some way to convince Kodak to make a new master roll of Kodachrome when the current batch runs out...

Well, there is one sure way to ensure that Kodak, Fuji, Ilford and all of the other film manufactures still make film 50 years from now - Buy it, shoot it, love it. Digital capture is awesome, but film is forever (especially if it is Kodachrome!).